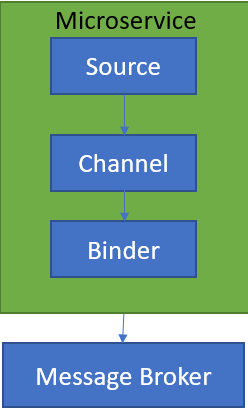
This is a continuation of part 1 on Kafka, Spring Cloud Stream on Docker. In this post, we will be talking about setting up a Spring boot project and configuring binder for Kafka and produce messages. Before we delve deeper, it is important to understand few concepts in Spring Cloud Stream and how it works.

SOURCE
When a microservice is ready to publish a message, it will publish the message using a source. Source identifies the contract between the message producer and the message destination.
CHANNEL
A channel is an abstraction over the actual queue or topic. A channel name is always associated with a target queue name in configuration, which makes it easy to switch queues by changing configuration.
BINDER
Its Spring’s code that talks to a specific message platform, like RabbitMQ, Kafka etc.
To get started, add
|
1 2 3 4 5 6 7 |
@EnableBinding(Array(classOf[Source])) @SpringBootApplication class KafkaDemoApplication{ def main(args: Array[String]): Unit = { SpringApplication.run(classOf[KafkaDemoApplication], args:_*) } } |
Next, configure your application.yml as below.
|
1 2 3 4 5 6 7 8 9 10 11 |
spring: cloud: stream: bindings: output: #maps to source.output in DemoProducer destination: kafkaDemoTopic #kafka topic content-type: application/json kafka: binder: zkNodes: dmira #kafka brokers: dmira #zookeeper |
The above binding maps to a channel called output with Kafka topic called KafkaDemoTopic. It specifies Kafka is the underlying message platform. You can switch this to RabbitMQ, ActiveMQ etc depending on your actual implementation. It also specifies where Kafka and Zookeeper are running. Couple of things to watch out for.
|
1 |
Failed to create producer binding; retrying in 30 seconds. |
You may get above error if port specifications are not correct. I didn’t specify ports as spring already knows default ports for Zookeeper and Kafka.
|
1 |
Magic v1 does not support record headers |
This is a common error, if you forget to add message converters.
Once, you have the above set up, create a message producer to post the messages to the topic as below.
|
1 2 3 4 5 6 7 8 9 10 |
@Component class DemoKafkaProducer { @Autowired private var source: Source = _ def postMessagesToTopic( )={ val lisyStr = List("1", "2", "3") lisyStr.foreach { t => source.output.send(MessageBuilder.withPayload(t).build) } } } |
That’s all you have to do. Check your Topic for messages.
|
1 2 3 4 |
C:\kafka_2.11-2.1.0\bin\windows>kafka-console-consumer.bat --bootstrap-server dmira:9092 --topic kafkaDemoTopic 1 2 3 |
Please watch the video below for additional details.
Download working source code from

