I recently did a video on distributed logging and tracing with Sleuth and Zipkin in Microservices, watch it here
Author: Seenu Kamisetty
I have experience in Microservices, Deep Learning, Cloud, Docker, Mobile, Java, Scala, Python. I greatly enjoy helping businesses to take advantage of technologies.
Check me out on Twitter @AddictedAi
Kafka with Spring Cloud Stream on Docker – part 2
This is a continuation of part 1 on Kafka, Spring Cloud Stream on Docker. In this post, we will be talking about setting up a Spring boot project and configuring binder for Kafka and produce messages. Before we delve deeper, it is important to understand few concepts in Spring Cloud Stream and how it works.
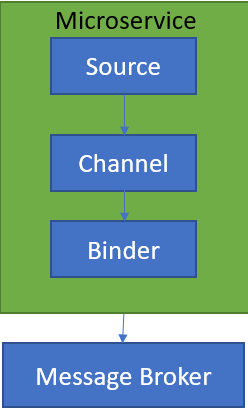
SOURCE
When a microservice is ready to publish a message, it will publish the message using a source. Source identifies the contract between the message producer and the message destination.
CHANNEL
A channel is an abstraction over the actual queue or topic. A channel name is always associated with a target queue name in configuration, which makes it easy to switch queues by changing configuration.
BINDER
Its Spring’s code that talks to a specific message platform, like RabbitMQ, Kafka etc.
To get started, add
|
1 2 3 4 5 6 7 |
@EnableBinding(Array(classOf[Source])) @SpringBootApplication class KafkaDemoApplication{ def main(args: Array[String]): Unit = { SpringApplication.run(classOf[KafkaDemoApplication], args:_*) } } |
Next, configure your application.yml as below.
|
1 2 3 4 5 6 7 8 9 10 11 |
spring: cloud: stream: bindings: output: #maps to source.output in DemoProducer destination: kafkaDemoTopic #kafka topic content-type: application/json kafka: binder: zkNodes: dmira #kafka brokers: dmira #zookeeper |
The above binding maps to a channel called output with Kafka topic called KafkaDemoTopic. It specifies Kafka is the underlying message platform. You can switch this to RabbitMQ, ActiveMQ etc depending on your actual implementation. It also specifies where Kafka and Zookeeper are running. Couple of things to watch out for.
|
1 |
Failed to create producer binding; retrying in 30 seconds. |
You may get above error if port specifications are not correct. I didn’t specify ports as spring already knows default ports for Zookeeper and Kafka.
|
1 |
Magic v1 does not support record headers |
This is a common error, if you forget to add message converters.
Once, you have the above set up, create a message producer to post the messages to the topic as below.
|
1 2 3 4 5 6 7 8 9 10 |
@Component class DemoKafkaProducer { @Autowired private var source: Source = _ def postMessagesToTopic( )={ val lisyStr = List("1", "2", "3") lisyStr.foreach { t => source.output.send(MessageBuilder.withPayload(t).build) } } } |
That’s all you have to do. Check your Topic for messages.
|
1 2 3 4 |
C:\kafka_2.11-2.1.0\bin\windows>kafka-console-consumer.bat --bootstrap-server dmira:9092 --topic kafkaDemoTopic 1 2 3 |
Please watch the video below for additional details.
Download working source code from
Kafka with Spring Cloud Stream on Docker – part 1
Kafka with Spring Cloud Stream gives you the power of Kafka with familiarity and added abstraction of Spring framework. An additional advantage of using Spring Cloud Stream is that you can switch and plug other middle ware from Kafka to RabbitMQ or other supported implementations very easy.
To get going create a Spring boot project from Spring Initializr website and add cloud-stream and Kafka as dependencies. This will bring in the following dependencies.
|
1 2 3 |
compile 'org.springframework.cloud:spring-cloud-stream' compile 'org.springframework.cloud:spring-cloud-stream-binder-kafka' compile 'org.springframework.kafka:spring-kafka' |
As soon as Spring Cloud Stream detects above Kafka binder in its classpath, it uses it and knows Kafka is used as the middleware.
Kafka Docker Image set up
While there are some options for the image, I found Spotify Kafka image to be easy to use, primarily because it comes bundled with Zookeeper and Kafka together in a single image. Run the following command from your Docker machine to install and run.
|
1 |
docker run -p 2181:2181 -p 9092:9092 --env ADVERTISED_HOST=localhost --env ADVERTISED_PORT=9092 spotify/kafka |
Note that if you are running on a remote machine, add an entry to your host file or modify it as below. ‘dmira’ is the name of the server.
|
1 |
docker run -d -p 2181:2181 -p 9092:9092 --add-host "dmira:127.0.0.1" --env ADVERTISED_HOST=dmira --env ADVERTISED_PORT=9092 --name eqrkafka spotify/kafka |
If you do not do it, you will get WARN Error while fetching metadata with correlation id 0 : {test=LEADER_NOT_AVAILABLE} (org.apache.kafka.clients.NetworkClient) . By adding –add-host to Docker run command, you are resolving the machine name to localhost. This is important because ADVERTISED_HOST is used as the hostname to publish to ZooKeeper for clients to use.
Now test to see if you can connect to Kafka on the Docker server from your local machine by creating a
|
1 |
kafka-topics.sh –create —dmira:2181 –replication-factor 3 –partitions 3 –topic testTopic |
You should get a confirmation message. You can verify the list of topics with
|
1 |
kafka_2.11-0.10.1.0/bin/kafka-topics.sh –list –zookeeper dmira:2181 |
In the next part, we will discuss how to set up Spring Cloud Stream with Kafka and post messages.
The following is the video version of this post.
Zuul – Service Gateway for Spring Microservices – 2
This is a continuation of my previous post. I would recommend you to watch the video in the previous post. In this post, we will discuss filters in Zuul, besides custom routing.
Zuul gives you the ability to customize the routes to the services. For example, if you have a service URL like http://ZUULGATEWAY/serviceb/contact, to make it short you can map it as below. This lets you call the same service as http://ZUULGATEWAY/sb/contact
|
1 2 3 |
zuul: routes: serviceb: /sb/** |
Filters
The main feature that Zuul give you is the ability to use the
- Pre
- Post
- Route
Please watch the following video for details about the filters.
Zuul – Service Gateway for Spring Microservices – 1
In a distributed architecture like a microservices, you’ll need to enforce cross-cutting concerns like security, logging, tracking etc across all the microservices and not to leave it to the individual services.
Zuul will act as a service gateway and sits between a service client and service discovery agent like Eureka. With this set up it is possible to call Zuul, instead of calling services directly, as we did before. As all the calls go through Zuul, you can enforce cross-cutting concerns with various filters.
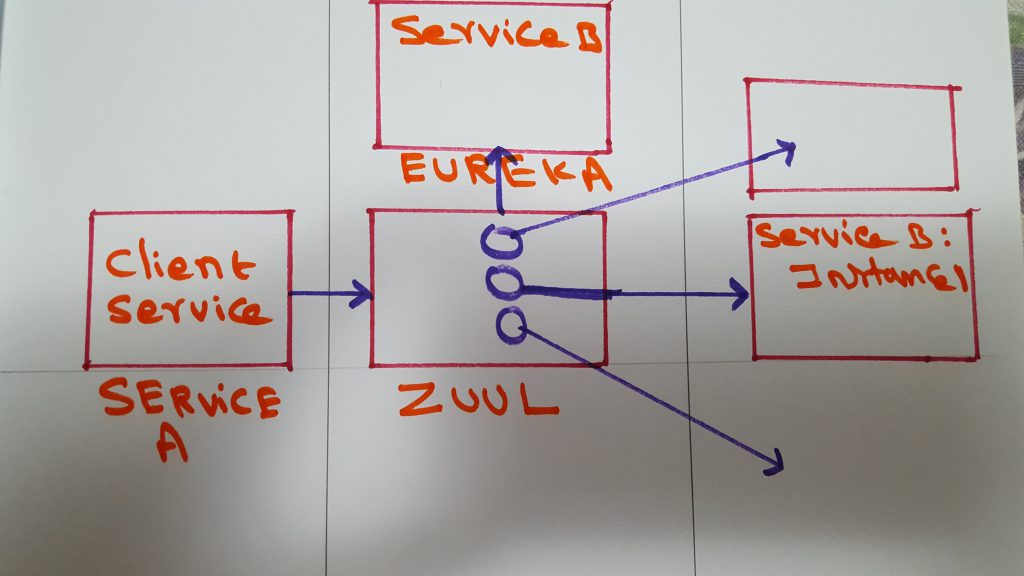
It would be a lot to cover all of Zuul in one post, instead, I am going to split it into 3 different posts. In this part one, I want to cover the basics of Zuul and show you how to set it up.
Please check the video below on how to set it up and test.
Hystrix – Spring Microservices
Microservices are distributed by nature, which makes responding to failures challenging. Imagine that service C calls service B, which in turn calls service A. If a call to service B fails, how do we figure out, which of the services in the chain failed. Is it service B? Or Is it service A that propagated to service B?
There also a video version of this post on youtube, I added the link at the bottom.
Hystrix comes to the recuse to resolve these issues inherent to Microservices. In order to enable Hystrix, we will need to add @EnableCircuitBreaker to your main application class.
In addition to clientside load balancing as discussed in my previous post, there are other 3 main strategies to deal with these issues.
Circuit breaker, if a call from service C to service B is taking too long, Hystrix will kill the call. If the call is failing consistently, Hystrix will trip the circuit and prevents future calls to service B. In order to do this, all you have to do is add @HystrixCommand to the method that is calling service B, like below.
|
1 2 3 4 5 |
@HystrixCommand public String contactServer() { String url = "http://SERVICEB/contact"; return restTemplate.getForObject(url, String.class); } |
Fallback, acts similar to the circuit breaker, but instead of just breaking the circuit, it will call a method provided as a fallback, like below.
|
1 2 3 4 5 |
@HystrixCommand(fallbackMethod = "contactBackupServer") public String contactServer() { String url = "http://SERVICEB/contact"; return restTemplate.getForObject(url, String.class); } |
In this case, Hystrix will call
|
1 2 3 4 5 6 |
@HystrixCommand(fallbackMethod = "contactBackupServer", threadPoolKey = "licenseByOrgThreadPool") public String contactServer() { String url = "http://SERVICEB/contact"; return restTemplate.getForObject(url, String.class); } |
The above code will use a separate thread pool called licenseByOrgThreadPool. This is helpful in preventing thread exhaustion when some services take longer than others. By using bulkhead you can have different thread pools for different remote service calls and custom configure each.
Download code from GitHub, it is in a hystrix folder.
Client Side load balancing with Ribbon
When you have multiple instances of Microservices, having a traditional load balancer like F5, HAProxy becomes a single point of failure, if the load balancer fails. To prevent this we can use Ribbon for client-side load balancing.
Client-side load balancing involves having the client look up all of the service instances from Eureka and caching the physical locations locally on the client side. This way, when it notices a problem with any of the instances, it removes that instance from the local cache and prevents any future calls to that service instance.
Spring Cloud has built-in support for Ribbon. To turn it on, make sure you have fetchRegistry set to true like below, this tells client services to get physical locations of instances registered on Eureka and cache locally. For example, if service B is calling service A, do the following in service B.
|
1 2 3 4 5 6 7 8 |
eureka: client: registerWithEureka: true fetchRegistry: true serviceUrl: defaultZone: http://localhost:8761/eureka/ instance: hostname: localhost |
Next, create a RestTemplate bean as shown below in your main application class.
|
1 2 3 4 5 |
@LoadBalanced @Bean public RestTemplate restTemplate() { return new RestTemplate(); } |
Now, all you have to do is
|
1 2 3 4 5 6 7 8 9 10 11 12 13 |
@Component public class RibbonClient { /*Because @LoadBalanced and @Bean exist in main app class, Spring automatically injects Ribbon enabled Rest template.*/ @Autowired RestTemplate restTemplate; @RequestMapping("/cotactserver") public String cotactserver() { String url = "http://SERVICEA/contact"; return restTemplate.getForObject(url, String.class); } } |
Here is the video for this post.
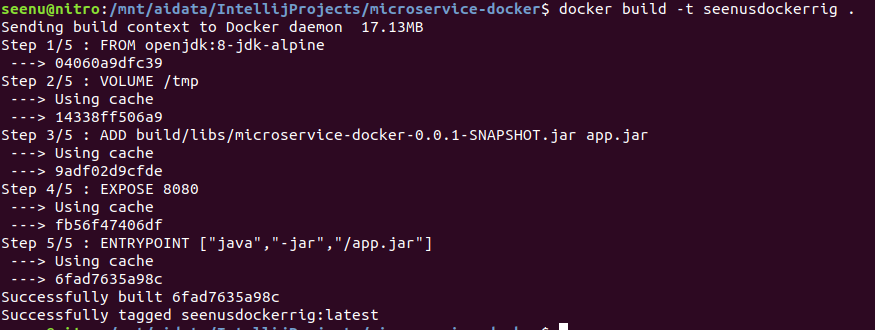
How to deploy Docker container to AWS ECS
This post complements my video on How to deploy Docker container to AWS ECS. If you haven’t seen my post on Dockerizing Microservices, I would highly recommend reading it first. This post along with the video covers the following topics.
- Docker setup
- Creating IAM user for ECR
- ECS Cluster
- Elastic Container Registry
- Task Definition
- Service
First log into AWS console, click on ECS (Elastic Container Service) and click on Repository to create a Docker repository. Once, the repo is created click on View Push Commands on the top right, you should see a list of commands as below.
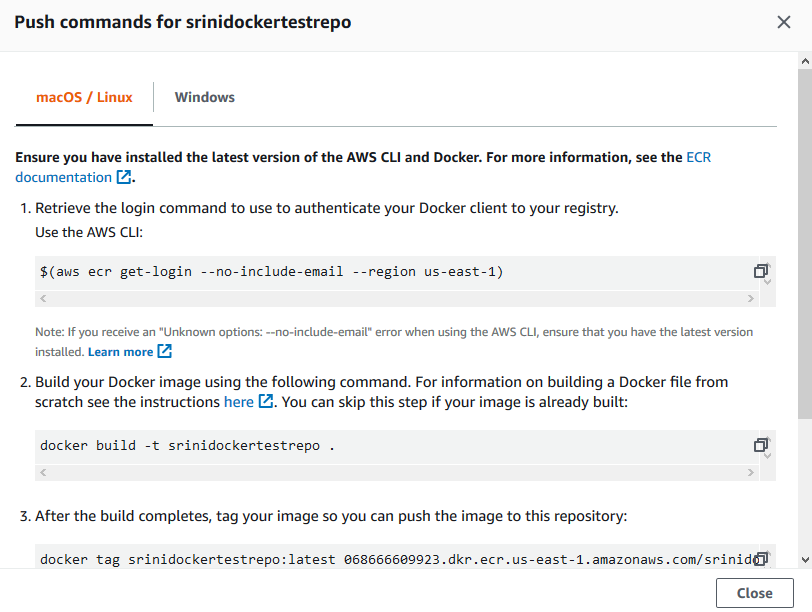
If you have not created an IAM user, watch the video to create an IAM user with proper permissions. Type ‘
Then type in the following commands, as listed. These commands will be different and specific to your image and repository.
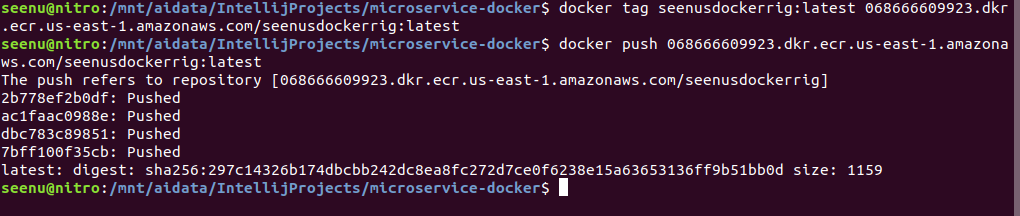
This completes and pushing your image to ECS. Please proceed to the video to complete the rest.
Scala For comprehensions
Check out my video on Scala for comprehensions here.
Scala fold, foldLeft and foldRight
foldLeft
|
1 2 |
val letters = List("a", "b", "c") letters.foldLeft(" ") { (m: String, n: String) => m + n } will output 'abc'. |
foldLeft takes 2 parameters. First one is a starting value, an empty string in our case. Second one is a function { (m: String, n: String) => m + n } , which in turn takes 2 parameters.
The first parameter (m) is an accumulator with an initial value of ” “. The second parameter (n) is the value from the list starting with “a”.
The following are the values for parameters m, n and the result at the end of each iteration.
|
1 2 3 4 5 6 7 8 9 10 11 12 13 14 |
1st iteration ------------- Starts with " " and adds 'a' from the list. m:" " n: a = a 2nd iteration ------------- Starts with the result of the 1st iteration 'a' and adds 'b' from the list. m: a n: b = ab 3rd iteration ------------- Starts with the result of the 2nd iteration 'ab' and adds 'c' from the list. m: ab n: c = abc |
Note:
The start value is passed as the first parameter to the function and list is evaluated from left to right.
foldRight
|
1 2 |
val letters = List("a", "b", "c") letters.foldRight("") { (m: String, n: String) => m + n } will output 'abc'. |
foldRight takes 2 parameters. First one is a starting value, an empty string. Second one is a function { (m: String, n: String) => m + n }‘ , which in turn takes 2 parameters.
The First parameter (m) is the value from the list starting with “c“. The second parameter (n) is an accumulator starting with the start value ” “. This is different from foldLeft.
The following are the values for parameters m, n and result at the end of each iteration.
|
1 2 3 4 5 6 7 8 9 10 11 12 13 14 |
1st iteration -------------- Starts with 'c' from the list and adds the start value " ". m: c n:" " = c 2nd iteration ------------- Starts with 'b' from the list and adds result from 1st iteration 'c'. m: b n: c = bc 3rd iteration ------------- Starts with 'a' from the list and adds result from 2nd iteration 'bc'. m: a n: bc = abc |
Note:
The start value is passed as the second parameter to the function and list is evaluated from right to left. This is different from foldLeft.
fold
fold works same as above, except the order in which operations are performed is unspecified, because of this, there are 2 additional conditions on
- Starting value must be neutral. e.g., Nil for list concatenation, 0 for addition, or 1 for multiplication. This is necessary as fold operation can work in parallel.
Fold is done on supertype of values in a given collection.
|
1 2 |
val letters = List("a", "b", "c") letters.foldRight("") { (m: String, n: String) => m + n } |
|
1 2 3 4 5 6 7 8 9 10 11 12 13 14 15 16 |
Iteration A ------------ Starts with " " and adds 'a' from the list. m:"" n: a = a ------------- Iteration B in parallel with Iteration A Starts with " " and adds 'b' from the list. m:"" n: b = b Iteration C in parallel with Iteration B and Iteration A -------------------------------------------------------- Starts with " " string and adds 'b' from the list. m:"" n: c = c output abc |
