In Scala, you can nest methods and functions inside a method. This is a useful feature when you want to encapsulate a part of the logic specific to the enclosing method. The following is an example of a nested method.
1
2
3
4
5
6
7
def mainMethod(x:String)={
def nestedMethod(y:String,z:String)={
println(y+z)
}
nestedMethod(x," a nested method")
}
println(mainMethod("I am"))
When you run this code, it will print ‘I am a nested function’.
Similarly, you can do nested functions as below.
1
2
3
4
5
6
def mainMethod(x:String)={
val nestedFucntion=(y:String,z:String)=>println(y+z)
Passing a function as a parameter helps in dividing complexity logically. For example, a function that iterates through a list of words and converts them to the upper case can be passed to any method that needs this functionality without exposing the list. It lets you delegate the complexity to the function. Here is the code both in Scala and Java.
Scala
First define a method that takes a function as a parameter.
1
2
3
def methodA(fn:()=>String):String={
fn()
}
The above function fn, takes no parameters and outputs a String. Let’s define a function that takes no parameters and outputs a String, so we can pass it to methodA.
1
val functionB=()=>"Hi, I am functionB from Scala, I am passed to functionA as a parameter."
Pass functionB to functionA as below.
1
2
3
def message:String={
methodA(functionB)
}
You should see “Hi, I am functionB from Scala, I am passed to functionA as a parameter.” in your browser. You can download the complete working example for both Scala and Java from my Git repo below. Here is the video version of this post.
Let’s implement the same thing in Java.
Java
1
2
3
4
5
6
7
8
9
10
@FunctionalInterface
publicinterfaceIFunc{
StringprintMessage();
}
publicStringmethodA(IFunc funcB){
returnfuncB.printMessage();
}
IFunc functionB=()->"Hi, I am functionB from Java, I am passed to functionA as a parameter.";
The main advantages of containerizing the microservices are
It makes applications portable, as dependencies can be packaged together with applications. For example, if one application needs JRE7 and the other needs JRE8, they can be packaged separately with their respective dependencies and deployed on a server, regardless of what JRE version exists on the server.
It removes the bottleneck of being limited by a number of servers during the release process, as you can deploy multiple versions of the same image or multiple features at the same time. For example, you can deploy multiple features for QA at the same time, regardless of how many servers you have.
You can start multiple instances of the application to handle increasing load.
As the containers can be isolated from each other, it will help in security.
Docker is a command line program, a background daemon. Docker containers run natively on Linux and share the kernel, making it very light weight as compared to VMs.
In this post, we will containerize a Spring Microservice with Docker. First, install Docker and make sure it is working as listed at Install Docker.
Then go to Spring Initializer site and add Web as a dependency and click on Generate Project to download a template project. Import the project into your favorite IDE and add the @RestController annotation to the main class. Add additional method with @RequestMapping as shown below.
Run the application and go to http://localhost:8080 and you should see “My First Dockerized Microservice” in your browser. This ensures, our service builds and runs fine without Docker. Stop the application and close your IDE.
Add a file called Dockerfile to the project directory and copy and paste the following contents into it.
Change the name of the jar file to your jar file in the 3rd line. In my case it was ‘microservice-docker-0.0.1-SNAPSHOT.jar’ and leave the rest as is.
FROM tells Docker to install the image from DockerHub if it is not present locally in Docker.
VOLUME specifies a directory outside the container, where Spring Boot creates working directories for Tomcat
ADD tells Docker to add the specified jar file to the image as app.jar
EXPOSE tells Docker to expose this port to the outside world.
ENTRYPOINT tells Docker to execute the app.jar file.
That is all you need.
Now go to the Terminal and cd to the project directory and execute the following commands.
1
2
3
docker build-tcontainerizedms.(thiswill build Docker image,change the last argument name asyou like)
docker run-d-p8080:8080containerizedms(thiswill createacontainer from above image andmap port8080inside the container to8080of the host machine)
docker ps(check ifthe container isrunning)
You should see the outputs as above.
Click on http://localhost:8080 and you should see “My First Dockerized Microservice” in your browse.
In the 2nd command -d tells Docker to run it as detached so your Terminal is not tied up. Port number on the left is host machine port, it can be any valid port. Docker container is an instance of an image. Think of an image as a Java class and a container as an instance of that class.
Once, you are done stop and remove containers with the following commands. Note that, each time you use Docker run, it creates a new container from the image.
1
2
docker ps(shows all the running containers along with container ids)
docker rm<container id>(Thiswill delete the container)
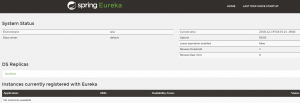
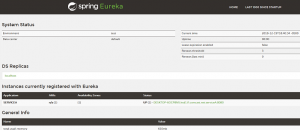
As you create more microservices, it is hard to keep track. Eureka helps in discovering and locating the services. It acts as a load balancer and service registry. All the services are identified by their names without port information. If service A running on port 8080 at URL http://localhost:8080 registers itself as SERVCIEA on Eureka, other services on Eureka can call it as SERVCIEA instead of calling http://localhost:8080.
If you rather watch the video on what’s in this post, see below, otherwise continue reading.
Eureka acts as an internal DNS and middle tier load balancer. With Eureka, load balancing happens at the instance level and the client instances know the information about which servers they need to talk to, making it ideal for the client-based load balancer.
To implement it follow the steps listed below.
Go to https://start.spring.io/ and download the project with Eureka Server as a dependency.
Add the following text to the application.properties.
Below, we are configuring the name for this service, port to run at and telling it not to register itself as a service.
1
2
3
4
5
6
7
8
spring.application.name=eureka-service
server.port=8761
eureka.client.register-with-eureka=false
eureka.client.fetch-registry=false
logging.level.com.netflix.eureka=OFF
logging.level.com.netflix.discovery=OFF
Add the following annotation to SpringBoot main class and run the application.
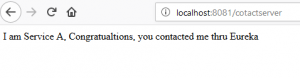
Notice the URL in the code above, we are not referencing ServiceA with complete URL as http://localhost:8080, rather with the name that it registered itself with Eureka.
Run ServiceB and check Eureka http://localhost:8761, it should show both the services.
Back propagation is used by Optimization algorithms to adjust w and b.
At the end of a forward propagation (see my previous post), output layer results in a predicted value, we compare this predicted value with the corresponding actual value from our training set to figure out the difference, also referred to as cost function. Cost function measures how weight w and bias b are doing on a training item to come up with a good prediction.
If the cost function is high, it means network predicted a value that is far from the actual value. For example actual value is 6, network predicted 2.
If the cost function is low, it means network predicted a value that is close to the actual value. For example actual value is 6, network predicted 5.
So the goal is to minimize the cost function. Weight w and bias b impact how close or far prediction is from the actual value. Optimization algorithms like Gradient Descent, Adam etc., update w and b to minimize the cost function.
Back propagation figures out, impact on cost function (sensitivity) , in relation to w and b, but it does not update w and b. Optimization algorithms like Gradient descent determine how much to change and update w and b based on the sensitivity.
For example in a simple 2 layered neural network, back propagation determines that increasing w in layer1, from 1 to 2, increases the cost function from 3 to 6. This means if you increase w by one unit, cost function goes up by 3 times the change. In other words, 3 is the derivative of the cost function with respect to w. Similarly back propagation calculates derivate of b. Gradient descent uses these derivatives to update w and b in order to minimize the cost function.
In the previous post, we talked about standing up a Spring Cloud Config server. In this post, we will discuss how client applications can get different properties for different environments like development, test, production etc from the Config server.
If you rather watch the video on what’s in this post, see below, otherwise continue reading.
First, let’s make sure, your Config server is running as indicated in the previous post.
Next, create a client application to test the Config server. Go to the Spring Initializr site https://start.spring.io/ and in the dependencies search box add web, config client dependencies (notice that for the Config server in the previous post, we added Config server as a dependency) and click on Generate Project to download an empty Spring boot project.
Create a file named bootstrap.properties or bootstrap.yaml in the resources folder and add the following properties.
1
2
spring.application.name=clientapp
spring.cloud.config.uri=http://localhost:8888
The first property sets the name of the application. Note, this should exactly match the name of the properties file you created in the previous post (remember you created a property file called clientapp.properties). This is how the Spring Config server knows, what properties to serve to this application.
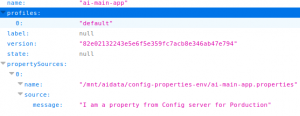
The second property indicates where the Config server is running. To see what properties are available to this application from the Config server go to http://localhost:8888/clientapp/default.
To your main class add a RestContoller
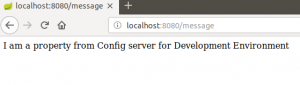
Start the clientapp application and go to http://localhost:8080/message in your browser, you should see I am a property from Config server for Development Environment. How to specify environment specific properties
Go to the Git repo you created in the previous post and create a new branch for the production environment.
1
2
//This will create a new branch called production from master
git checkout-bproduction master
Now, edit clientapp.properties as shown below and commit the change.
1
message=Iamapropertyfrom Config server forProduction Environment
In your clientapp project add an additional property to bootstrap.properties
1
spring.cloud.config.label=production
This specifies which Git branch you want Config server to serve your properties. If you do not specify the label, Config server uses master branch by default.
Here is the whole bootstrap.properties.
1
2
3
spring.cloud.config.uri=http://localhost:8888
spring.application.name=clientapp
spring.cloud.config.label=production
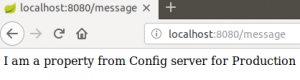
Restart the clientapp application and to go to http://localhost:8080/message in your browser, you should see I am a property from Config server for Production Environment.
Instead of using different branches to store properties for different environments, you can also use different repos.
In most cases, you can also use application.properties instead of bootstrap.properties. but note that bootstrap gets higher precedence. I think it is better to keep external properties in bootstrap and the rest in applcation.properties for a clean separation.
When multiple microservices are moving through a release cycle from development, test, UAT to production, it is a big setback to on-demand release process to update environment specific properties like DB connection strings, message broker parameters, email server properties etc. for each of the environments.
Spring Cloud Config server resolves this issue, by moving the properties out of the applications and centralizing them. There is no need to keep updating properties from one environment to the other, as applications move along in the release process. This offers a lot of flexibility and speeds up the entire deployment cycle.
With Config server, you have a central place to manage the properties across all environments.
For a configuration server to serve properties to client applications, it needs to be pointed to the source where properties exist. While you can use a file system or database, in this post we focus on Git repo backed Config server which is the most common set up.
Create an empty folder called config-properties-env anywhere on your system and inside the folder create a file called clientapp.properties. Add the following to the file and save.
message=I am a property from Config server for Development Environment
Initialize a Git repo, add the file and commit.
1
2
3
git init
git add client.properties
git commit-m"dev properties"
Config server
Standing up Spring Cloud Config server is very easy, it is like any other microservice with an additional annotation and a dependency.
Go to the Spring Initializr site https://start.spring.io/ and in the dependencies search box, add Config server, web dependencies and click on Generate Project to download an empty Spring boot project.
Add @EnableConfigServer annotation to the main class, as shown below.
Add the following to the application.properties file.
You have now successfully set up the Config server and ready to serve the properties to the client applications.
Here is the video version of it.
In the next post, I will discuss how client applications can use the Config server to get properties, how to organize properties for different environments, and how to encrypt passwords in property files.
We recently moved a few applications to AWS cloud and immediately started noticing a significant drop in performance. This was happening for the applications that were being developed locally on-premise, and access Oracle database on the cloud. Performance decreased by many folds. One of the applications that used to take 5 minutes to process 35 million records, was taking 3 hours.
I excepted a little bit performance hit, but not 36 times slower. First, I checked all our recent commits, to see if any of the recent changes were causing the issue, but I didn’t notice anything significant. Then, I checked SQL execution plan and fine-tuned SQL created indexes on the key columns. This didn’t make any difference at all. I also tried tracing network and traffic but didn’t see anything important.
Adding to the confusion, when I tried running the same queries as in the application with SQL clients like SqlPlus, Toad etc. selects ran in seconds. This ruled out the possibility of something wrong with the SQL. To narrow it down, I created a very simple microservice that ran same queries without any data processing, but it took hours to run. This pointed to the fact that, even though SQL itself was running fast, once it was used in an application, something was going wrong.
After fiddling with different configurations, I started noticing immediate improvements in performance, as soon as I added setFetchSize to Spring JdbcTemplate and tuned it, the performance came back to before migration levels, from 3 hours to 5 minutes. Here is the code in Scala, depending on your configuration your fetch size, may be different.
1
2
3
@Autowired varjdbcTemplate:JdbcTemplate=_
jdbcTemplate.setFetchSize(1000)
If you are using Spring’s NamedParameterJdbcTemplate, configure JdbcTemplate as above and pass it to NamedParameterJdbcTemplat as a constructor arg.