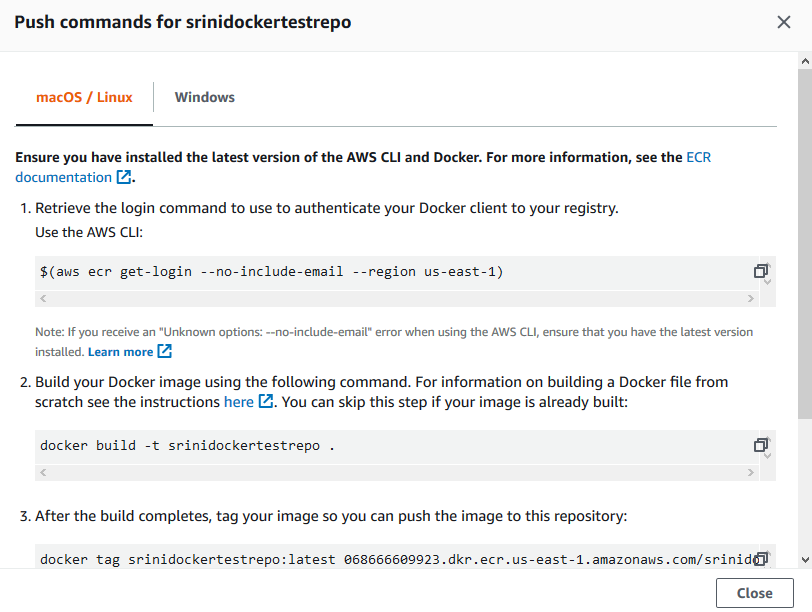
This is a continuation of part 1 on Kafka, Spring Cloud Stream on Docker. In this post, we will be talking about setting up a Spring boot project and configuring binder for Kafka and produce messages. Before we delve deeper, it is important to understand few concepts in Spring Cloud Stream and how it works.
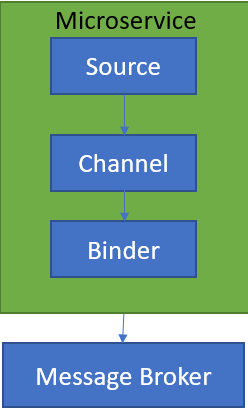
SOURCE When a microservice is ready to publish a message, it will publish the message using a source. Source identifies the contract between the message producer and the message destination.
CHANNEL A channel is an abstraction over the actual queue or topic. A channel name is always associated with a target queue name in configuration, which makes it easy to switch queues by changing configuration.
BINDER Its Spring’s code that talks to a specific message platform, like RabbitMQ, Kafka etc.
To get started, add @EnableBinding annotation to the bootstrap class of your Spring boot project, you created in part 1. This will turn Spring boot project into a Spring Cloud Stream project.
The above binding maps to a channel called output with Kafka topic called KafkaDemoTopic. It specifies Kafka is the underlying message platform. You can switch this to RabbitMQ, ActiveMQ etc depending on your actual implementation. It also specifies where Kafka and Zookeeper are running. Couple of things to watch out for.
Kafka with Spring Cloud Stream gives you the power of Kafka with familiarity and added abstraction of Spring framework. An additional advantage of using Spring Cloud Stream is that you can switch and plug other middle ware from Kafka to RabbitMQ or other supported implementations very easy.
To get going create a Spring boot project from Spring Initializr website and add cloud-stream and Kafka as dependencies. This will bring in the following dependencies.
As soon as Spring Cloud Stream detects above Kafka binder in its classpath, it uses it and knows Kafka is used as the middleware.
Kafka Docker Image set up
While there are some options for the image, I found Spotify Kafka image to be easy to use, primarily because it comes bundled with Zookeeper and Kafka together in a single image. Run the following command from your Docker machine to install and run.
If you do not do it, you will get WARN Error while fetching metadata with correlation id 0 : {test=LEADER_NOT_AVAILABLE} (org.apache.kafka.clients.NetworkClient) . By adding –add-host to Docker run command, you are resolving the machine name to localhost. This is important because ADVERTISED_HOST is used as the hostname to publish to ZooKeeper for clients to use.
Now test to see if you can connect to Kafka on the Docker server from your local machine by creating a testTopic.
This post complements my video on How to deploy Docker container to AWS ECS. If you haven’t seen my post on Dockerizing Microservices, I would highly recommend reading it first. This post along with the video covers the following topics.
Docker setup
Creating IAM user for ECR
ECS Cluster
Elastic Container Registry
Task Definition
Service
First log into AWS console, click on ECS (Elastic Container Service) and click on Repository to create a Docker repository. Once, the repo is created click on View Push Commands on the top right, you should see a list of commands as below.
If you have not created an IAM user, watch the video to create an IAM user with proper permissions. Type ‘aws configure’ on your terminal and log in using access key and the secret access key as below.
Then type in the following commands, as listed. These commands will be different and specific to your image and repository.
This completes and pushing your image to ECS. Please proceed to the video to complete the rest.
The main advantages of containerizing the microservices are
It makes applications portable, as dependencies can be packaged together with applications. For example, if one application needs JRE7 and the other needs JRE8, they can be packaged separately with their respective dependencies and deployed on a server, regardless of what JRE version exists on the server.
It removes the bottleneck of being limited by a number of servers during the release process, as you can deploy multiple versions of the same image or multiple features at the same time. For example, you can deploy multiple features for QA at the same time, regardless of how many servers you have.
You can start multiple instances of the application to handle increasing load.
As the containers can be isolated from each other, it will help in security.
Docker is a command line program, a background daemon. Docker containers run natively on Linux and share the kernel, making it very light weight as compared to VMs.
In this post, we will containerize a Spring Microservice with Docker. First, install Docker and make sure it is working as listed at Install Docker.
Then go to Spring Initializer site and add Web as a dependency and click on Generate Project to download a template project. Import the project into your favorite IDE and add the @RestController annotation to the main class. Add additional method with @RequestMapping as shown below.
This file contains hidden or bidirectional Unicode text that may be interpreted or compiled differently than what appears below. To review, open the file in an editor that reveals hidden Unicode characters.
Learn more about bidirectional Unicode characters
Run the application and go to http://localhost:8080 and you should see “My First Dockerized Microservice” in your browser. This ensures, our service builds and runs fine without Docker. Stop the application and close your IDE.
Add a file called Dockerfile to the project directory and copy and paste the following contents into it.
Change the name of the jar file to your jar file in the 3rd line. In my case it was ‘microservice-docker-0.0.1-SNAPSHOT.jar’ and leave the rest as is.
FROM tells Docker to install the image from DockerHub if it is not present locally in Docker.
VOLUME specifies a directory outside the container, where Spring Boot creates working directories for Tomcat
ADD tells Docker to add the specified jar file to the image as app.jar
EXPOSE tells Docker to expose this port to the outside world.
ENTRYPOINT tells Docker to execute the app.jar file.
That is all you need.
Now go to the Terminal and cd to the project directory and execute the following commands.
1
2
3
docker build-tcontainerizedms.(thiswill build Docker image,change the last argument name asyou like)
docker run-d-p8080:8080containerizedms(thiswill createacontainer from above image andmap port8080inside the container to8080of the host machine)
docker ps(check ifthe container isrunning)
You should see the outputs as above.
Click on http://localhost:8080 and you should see “My First Dockerized Microservice” in your browse.
In the 2nd command -d tells Docker to run it as detached so your Terminal is not tied up. Port number on the left is host machine port, it can be any valid port. Docker container is an instance of an image. Think of an image as a Java class and a container as an instance of that class.
Once, you are done stop and remove containers with the following commands. Note that, each time you use Docker run, it creates a new container from the image.
1
2
docker ps(shows all the running containers along with container ids)
docker rm<container id>(Thiswill delete the container)